Starting a project with Good Developer Experience in mind
At Orange Jellyfish we value good developer experience as we know it leads to a good team culture and ultimately makes the experience of working on a product and shipping code much easier and more efficient. So what are some key elements that make for a good developer experience (DevX)?
- Continuous delivery enabling fast shipping of software through automation
- Short feedback loops
- Team structures which encourage collaboration and empowerment to remove blockages
- Good local development environments
- Up to date documentation and frictionless onboarding set up
This is just a sample of some factors and is by no means and exhaustive list. Any company that focuses on good DevX will most likely have a better product, a happier team and faster and safer software delivery. With good tools and processes they’ll also encourage faster innovation and be able to attract and retain talent more easily.
In this blog post we’ll be focusing on some simple automated workflows you can implement when setting up a new project which will enable more effortless deployment resulting in faster shipping of code while upholding consistent coding standards.
The challenge when setting up any new project is to think about and set out all the processes upfront. Getting something working quickly and seamlessly is difficult especially as there are so many options out there. We're sharing some tools and simple automated workflows we like to use when setting up a project which mean we can be confident in the quality of code we ship.
Pre-commit hooks
An easy way to get started with ensuring code quality is to add commit hooks to your repo. The pre-commit hook is run before a commit is saved, if the hooks fail then the commit is aborted. It's useful for providing a quick feedback loop which is important as it speeds up the overall development process. Issues can be fixed immediately instead of waiting for it to be picked up in a later process such as a code review which may then have to be repeated.
We have chosen to only check linting at this stage and only on the files that have been changed as part of the commit. This is because we want to keep the running time of this hook as short as possible. Creating a lengthy pre-commit hook will make committing code more time consuming will have the knock on effect of slowing down development. This will make it more likely that developers will skip over these checks when committing their code which defeats the point of having them.
If you're interested in setting this up yourself we’ve previously written a blog about our setup and how to emulate it here.
Status checks
These are checks we will be running on every pull request (PR) that’s created on our repository. The results are displayed directly on the PR which quickly shows anyone reviewing the code if there are any failures. For our status checks we've opted to run both linting and unit tests via a simple GitHub action.
 Example passing status checks on a PR
GitHub Actions is useful API to help automate workflows for CI/CD processes. It enables us to represent workflow jobs as code in our repo which is beneficial for creating reusable processes.
You can create your own workflow within a .github/workflows in your repository and specify what event you would like to trigger the workflow to run.
name: Status checks

on: [pull_request]

jobs:
  Linting-unit-test:
    runs-on: ubuntu-latest
    name: Linting & Unit Tests
    steps:
    - uses: actions/checkout@v2
      name: Checkout repository
    - uses: actions/setup-node@v2
      name: Set up Node.js
      with:
        node-version: 16
        cache: 'npm'
    - run: |
        npm i
        npm run lint
        npm run test
Here, our Status checks action runs on any PR event such as a newly opened PR or any update to an existing one. It checks out the repo, builds the app and then runs linting and unit tests. This is a better place to run unit tests rather than the pre-commit hook as they shouldn't take too long to run and are unlikely to hold up the development process as they will finish before a code review is completed.
Branch protection
We recommend enabling some branch protection rules within your repo on at least the branch that is deployed to production. This is especially important if you plan to add an automated deployment workflow which is triggered by a push to your main branch.
There are a wide range of choices when picking your branch protection strategy and you can configure a different set of rules for each branch.
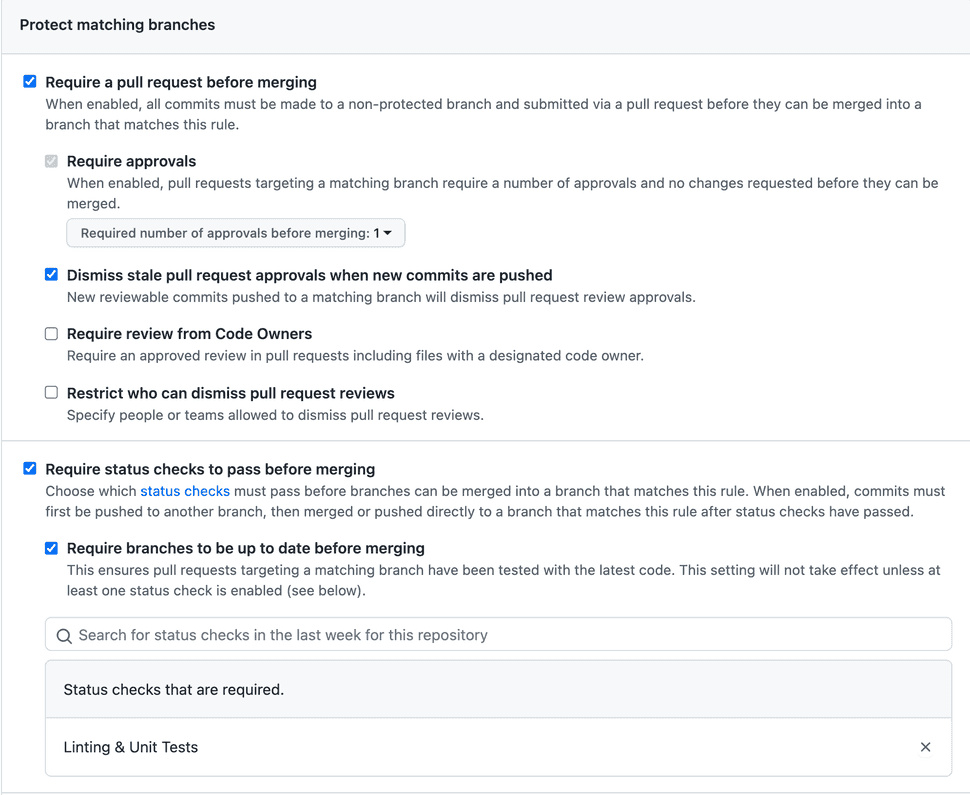
We have opted to protect our main branch with these permissions:
- We require a PR to be raised before merging and these PRs require at least one approval, thereby enforcing a code review by a second pair of eyes before something makes it into production.
- We also require status checks to pass before any code can be merged, so that no code quality checks can be bypassed before it is merged into the
mainbranch.
 Branch protection options from the Github
You may also want to consider adding some protection rules to a staging branch if that is part of your deployment workflow.
Documentation
Finally don’t forget to document all the good work you’ve done to set up these workflows. Adding information to the Readme, internal documentation sites and adding workflow diagrams will be invaluable to other members of your team.
We've showed you some simple ways to start automating parts of the development processes and have hopefully inspired you to think about DevX when starting new projects. Let us know some of your favourite tools, tips and tricks for a good developer experience by tweeting us @orangejellyfishhq.